Glass Installation in Hollow Metal Doors and Frames
Adding glass to hollow metal doors, sidelight frames, transoms or borrowed lite window frames is a design element with many benefits. Whether indoor or outdoor, the application may require clear views for safety or observation. Today LEED credits are available for daylighting, thanks to the use of natural light and less need for energy consumption. Whatever the reason for designing glass into an elevation, the installation is imperative to ensure the opening performs as intended and is watertight.
There are many glass options to choose from, including double and triple glazed windows that help with energy efficiency and sound attenuation. This article will focus on installation of single-glazed windows. Types of single-glazed glass include tempered glass, wire glass, laminated glass and architectural textured glass. There are other specialty types of glass, including insulated, coated, polycarbonate or bullet resistant glazing, which may require other specific procedures during installation. Be sure to consult with the door or frame manufacturer if using any specialty glass types.
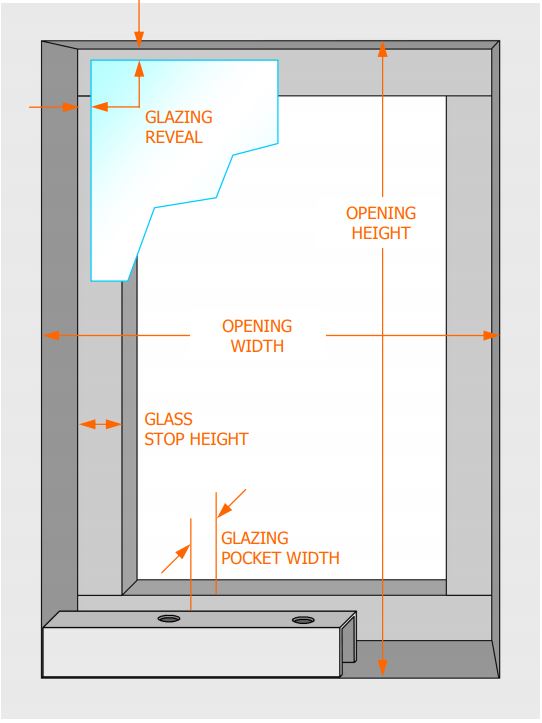
The first step in a successful glass installation is accurately measuring for glass. Start by measuring the opening width and height, then deducting ¼” from each. This is the exact glass cut size and will give you a 1/8” glass reveal, or clearance, on all four sides between the glass and opening. When ordering, the industry standard is to call out the glass size as width x height x thickness.
Glass stops protrude into the opening, sandwiching the glass to secure it in place. Typically there will be one set of fixed stops, referred to as backstops, and one set of removable stops that allow the glass to be inserted. After removal of glass stops, they should be wiped clean for proper adherence of glazing tape on both the backstops and removable stops. Glazing tape should be a double-sided closed cell foam tape that compresses between the glass and stops. To measure for proper glazing tape thickness, be sure and measure the overall glazing pocket width, then subtract the glass thickness and divide by two.
With the glazing tape installed on the backstops and adhesive surface exposed, you are ready to install the glass. The first step here is to install glass setting blocks at the base condition. These should be sized to match the glass reveal determined in the glass measurement step – usually 1/8” thick. Once the setting blocks have been placed approximately ½” from the bottom corners, set the bottom edge of glass on setting blocks with the top edge leaning away from the opening. Check to ensure a consistent reveal, and slowly lean the glass into the opening so that it makes contact with the glazing tape.
Now that the glass has been set in the opening and adhered to the backstops, a commercial grade clear silicone should be used to fill the perimeter reveal, flat and even with the face of the glass. Then peel the glazing tape release liner from the removable stops, and reinstall those stops beginning with the bottom, followed by the top and sides. Once all stops are in place, install fasteners in pre-drilled holes. For exterior applications, after finish painting apply a silicone bead where the glass meets the stops on the outside of the glass to ensure no water penetration. For more detailed information and images, refer to this handy installation guide: https://stilesdoors.com/techdata/pdf/Glass%20Installation%20Guide%200710.pdf
No comments yet - you can be the first!